BREEZE VERSION SUPPORTED
This template only supports Breeze DSLR Remote Pro version 3.7 and up.
PACKAGE STRUCTURE
Transferring profile from one computer to another have been simplified with Breeze DSLR Remote Pro v3.7. Following are the typical folders and files contained inside our interface packages.
MAIN FOLDER
- README.txt – contains relevant information regarding usage, links to license and instructions of our package.
- MAIN FILES folder contains core files required to install the interface.
- ASSETS folder is not required to operate your photo booth. It contains different images associated with our interface that can be combined to create new screens not included in our package
Examples
- The default sharing.jpg has all icons available for sharing within DSLR Remote Pro. If you have an event that only require Email and SMS, you can create a screen that only has the Email and SMS icons.
- You want to change the names of the filters. Blank ready images are available so that you can create your own names for the filters.
SUB FOLDERS
MAIN FILES folder have sub folders underneath it in the following hierarchy.
- MAIN FILES
- Breeze versions
- Screen resolutions
- Install files and core files (v3.7)
- Screen resolutions
- Breeze versions
ADDITIONAL FILES AND FOLDERS
- _INSTALL.xml – use this file to install our interface.
- MENUS folder contains all images required to operate DSLR Remote Pro with our interface.
- MENUS_settings.xml – main profile configuration file.
- no-filter.bat – run this batch file if you don’t want the filter icons to be visible to the guests.
- with-filter.bat – run this batch file to make the filter icons available to the guests.
CREATE A BACKUP
NOTE: For DSLR Remote Pro version 3.7 — If you previously made changes to your profile settings, make sure you create a backup using the following steps. Our installation file will modify these settings.
- Before installation, create a backup of your
- Profile settings – From DSLR Remote Pro, open your Advance Settings, click on Profiles…, click on Save Profiles…, and save to a folder for future access.
- Profiles folder – Create a copy of your existing photo booth profiles.
HOW TO INSTALL
Breeze DSLR Remote Pro Version 3.7
- Unzip the compressed file you downloaded from our website to where you want it to run on your photo booth computer.
- Open DSLR Remote Pro
- Drag and drop the _INSTALL.xml file onto the DSLR Remote Pro main window.
- Click Yes when prompted.
- Drag and drop the MENUS_settings.xml file onto the DSLR Remote Pro main window.
- Click Yes when prompted.
BEFORE USING OUR INTERFACE
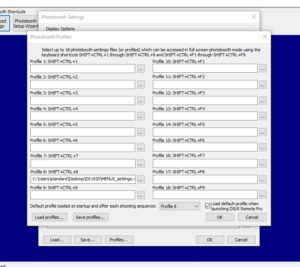
PROFILE SETTINGS
For version 3.7 installation, a new feature was added to allow modification of the default profile in order to easily install and move profiles from one computer to another. Below is an example of the changes made after our interface was installed.
ADD YOUR OVERLAY
- Our package does not come with an overlay.png or background.jpg. Please consult the Breeze DSLR Remote Pro Manual on how to configure your photo booth layout.
CONFIGURE YOUR PRINTER
- Please consult the Breeze DSLR Remote Manual to set your Printer with our interface.
LOCATION WHERE PHOTOS WILL BE SAVED
Breeze DSLR Remote Pro version 3.7
- Your event photos will be saved in a subfolder called EventPhotos inside our interface folder (e.g. TRxxxx\EventPhotos)
ADDING OVERLAY AND TITLE TO GIF/BOOMERANG
In order to simplify and use 1 profile for both Photo and Video booth, our interface was configured to use the Video settings in DSLR Remote Pro to capture the frames. Following is the instruction directly from the Breeze DSLR Remote Pro manual on how to set overlays and titles.
One or more optional title pages can be displayed at the beginning or end of the video clip. To add a single title page place a JPEG image named video_stills_title.jpg in the photo booth images folder.
To add multiple title pages to create a short animation place JPEG images named video_stills_title_1.jpg, video_stills_title_2.jpg, video_stills_title_3.jpg etc. in the photo booth images folder
If the title page image is larger than the GIF width setting it will be resized to the same width. Use the “Title display time” to specify how long each title page should be displayed.
The title page or pages can be displayed before or after the video clip. It probably makes more sense to display titles after the clip because browsers that display animated GIFs will normally show a thumbnail generated from the start of the animation. Putting the title at the end will mean that the thumbnail will show the first frame of the video clip whereas if the title is at the start of the animation the thumbnail will show the title page.
The “Ping-pong forward/backwards display” option specifies whether the animated GIF should display the clip forwards then backwards (e.g. frame 1, 2, 3, 4, 5, 4, 3, 2, 1, 2, 3) or forwards only (frame 1, 2, 3, 4, 5, 1, 2, 3, 4, 5, 1).
An optional overlay can be displayed over each photo by placing a PNG file named video_stills_overlay.png in the photo booth images folder. A different overlay can be used for each captured frame by naming the overlays video_stills_overlay_1.png, video_stills_overlay_2.png, video_stills_overlay_3.png etc.
The PNG overlay image can be made transparent or semi-transparent by adding an alpha channel. If the overlay image is larger than the GIF width setting it will be resized to the same width. If the overlay is smaller than the GIF it will be displayed bottom right justified i.e. in the bottom right hand corner.
Select the “Create PNG copies of GIF frames in ‘GIF_frames’ subfolder” option to create PNG copies of all the frames that make up the animated GIF. This is useful if the frames are to be processed by other software.
Please note: It is not necessary to select this option to create MP4 copies of the GIFs.
Warning: The PNG files created when this option is selected can be quite large and may fill up the computer’s hard disk.
Please consult the Breeze DSLR Remote Pro manual for more details.
FAQ
We design our interface with the last photo on the queue to say “LAST PHOTO”. Normally, 1.jpg will have “TAKING PHOTO 1”, 2.jpg will have “TAKING PHOTO 3”, 3.jpg will have “TAKING PHOTO 3” and 4.jpg will have “LAST PHOTO”. This is ideal for 4 photos layout. If you’re doing 3 photos layout, the batch file will rename 3.jpg with _last_photo.jpg to have “LAST PHOTO”. To revert back to 4 photos layout, double click on the 4_photos_layout.bat Click on File, select Preferences… and modify the “Download folder where photos and movies are” with your preferred location. Provided with our interface is an ASSETS folder. Using an image editor (i.e. Photoshop), you will be able to create your own share.jpg screen, including only the social icons you wish to offer. Breeze DSLR Remote Pro version 3.7 Breeze DSLR Remote Pro version 3.5-3.6 Double click photo_video.bat from the interface folder. The batch file will rename _ready_WITHVIDEO.jpg and will overwrite the current ready.jpg. Double click photo_only.bat from the interface folder. The batch file will rename _ready_NOVIDEO.jpg and will overwrite the existing ready.jpg. Note: This does not remove the Video mode touch point. If you want to remove the touch point, you would have to go to the touchscreen setting and delete the video action.
When you install our interface, it modifies the preference to save to the EventPhotos folder inside our interface folder. If you want to modify this location, from DSLR Remote Pro, click on File, select Preferences… and modify the “Download folder where photos and movies are”
This location remains unchanged. Click on File, Preferences to verify the download location.
Comments are closed.